



Custom Patio Door Sizes: Measurement Guide
The architect's elevation is clean, the sightline lands exactly where it should, and the patio seems designed for a wall of uninterrupted glass. Then the site measure reveals that the existing opening is out of square, the finished floor is higher than expected, and the “96-inch door” was never meant to fit a 96-inch hole.
That's where custom patio door sizes stop being a design preference and become a coordination exercise. The finished unit must match the opening, the structure, the drainage strategy, the glass specification, and the way the installer will physically move it into place. A beautiful door that arrives with the wrong dimensions is still a failed specification.
Table of Contents
- Why Standard Sizes Fail Luxury Renovations
- Translating Rough Openings to Custom Dimensions
- The Field Measurement Protocol for Custom Units
- Structural and Logistical Limits of Oversized Doors
- How Material Choice Dictates Final Sizing
- Finalizing the Factory Specification and Order
Why Standard Sizes Fail Luxury Renovations
A standard patio door works well when the opening was framed around that product. Luxury renovations often work in the opposite direction. The architect establishes ceiling lines, cabinetry, floor transitions, exterior views, and mullion alignments first, then expects the fenestration to complete the composition.
A familiar 72-inch or 96-inch nominal door can disrupt that intent. Its meeting stile may land across a key interior sightline, the head may sit below a carefully aligned ceiling detail, or the frame may force an awkward patch in an existing wall. Stock dimensions can also leave unusable strips of masonry or framing at either side of the opening.
Custom sizing protects the visual composition
Sliding patio doors became a recognizable residential product only after World War II. An industry history places the form outside U.S. residential construction before about 1947 and connects its practical adoption to aluminum extrusion, insulated glass units, and tempered safety glass, developments that made wide glazed openings more feasible and safer. By 1980, manufacturers were already standardizing configurations such as OX, XO, OXO, and OXXO (RoomSketch 3D's sliding door history and sizing guide).
Those standard families are useful reference points, but they don't define what a high-end project needs. A made-to-order system can place panel breaks on architectural axes, extend glass toward a taller ceiling, or coordinate a multi-panel opening with adjacent fixed glazing. The value lies in controlling the complete composition rather than accepting whatever a stock frame dictates.
Practical rule: Choose the panel layout and sightline strategy before anyone treats a nominal width as an orderable dimension.
This is especially important in luxury renovations near Paradise Valley, where a remodel may combine existing masonry, new structural work, custom millwork, and large glazed openings. The door has to belong to that assembly. It can't be specified as an isolated replacement component.
Custom doesn't mean dimensionally careless
The commercial case also supports this shift. One 2026 industry summary reports that custom-made doors represent 27% of total door sales, while 68% of buyers prioritize customization (ZipDo's window and door industry statistics). Those figures don't remove the need for careful engineering, but they show that made-to-order doors occupy a substantial part of the market.
Custom sizing solves problems that standard products cannot, including irregular openings and coordinated multi-panel designs. It doesn't solve poor field data. The factory can build the specified unit accurately only when the project team separates the design dimension from the actual framed opening and documents the conditions around it.
Translating Rough Openings to Custom Dimensions
A framed opening can look generous until the installer checks its narrowest point, the sill slope, and the clearance needed for a heavy panel. That is why a call size must never be treated as the physical hole in the wall. A “96-inch door” identifies a nominal product dimension or family. It does not tell the framer how wide or tall to build the rough opening.
The rough opening must make room for the frame, shims, adjustment, insulation, waterproofing, and the tolerances needed to keep the sill level and the panels operating correctly. The selected manufacturer and system determine those allowances. Use the product's shop drawings rather than a generic rule borrowed from another door.
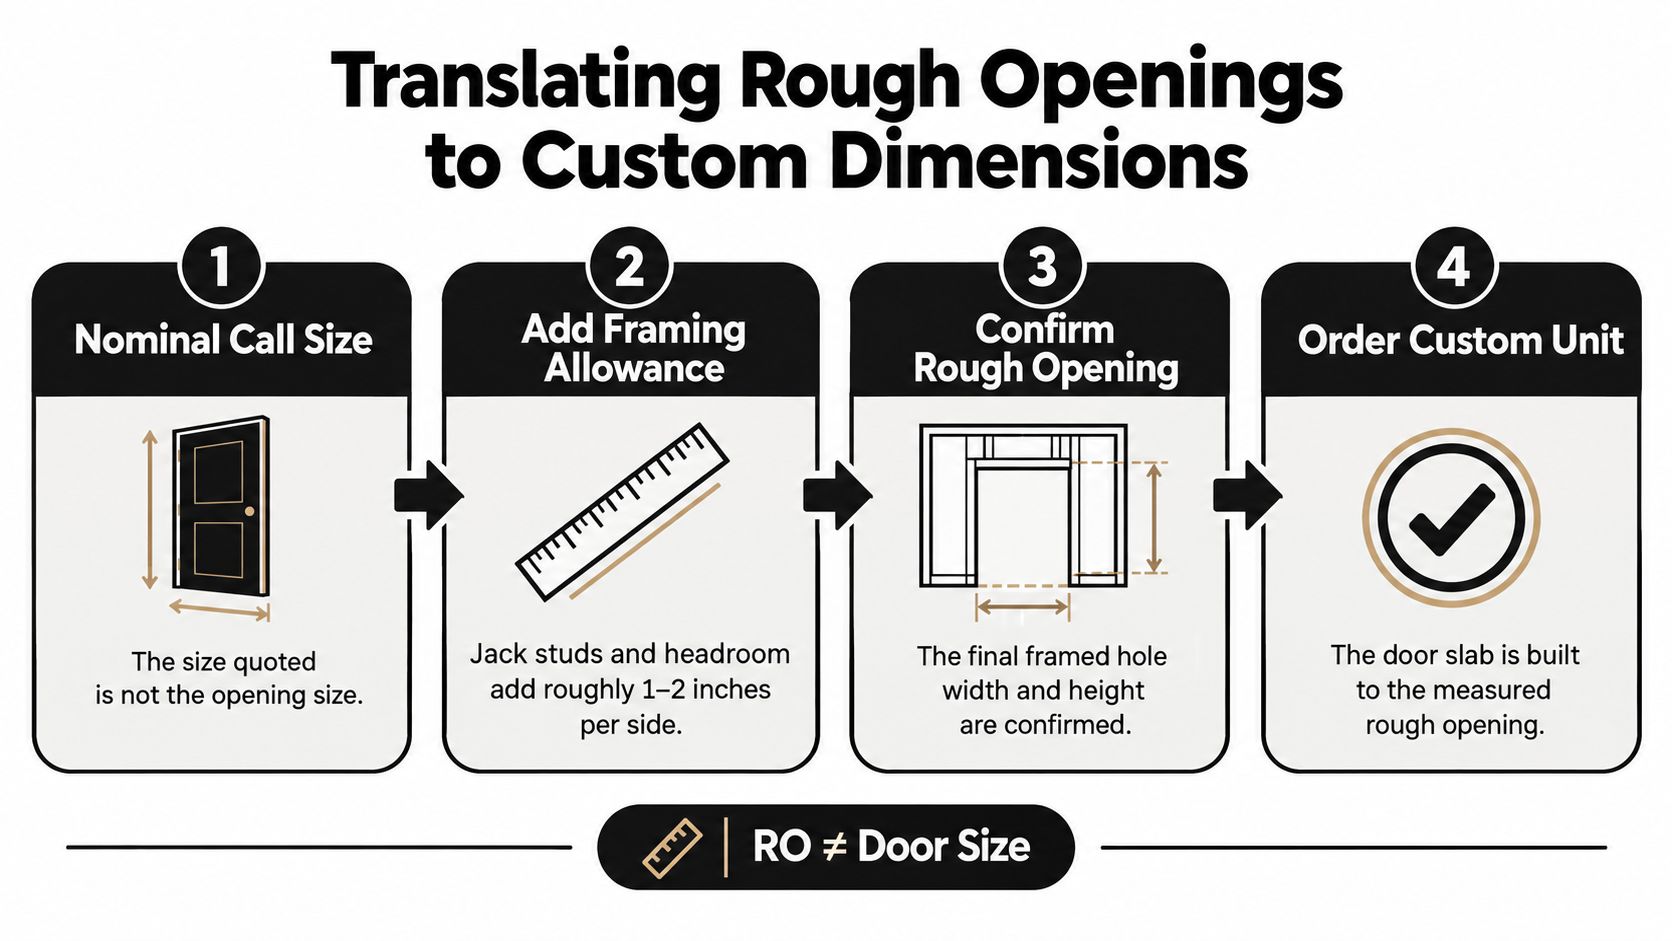
Nominal dimensions are starting points
Two-panel products commonly use 60, 72, 84, and 96 inches, with 72 and 96 inches especially common. Multi-slide systems can extend from 144 inches to more than 30 feet, so the panel count, stacking direction, and operating sequence must be fixed before the opening is framed. These figures describe product families, not permission to frame an opening to the same number.
The distinction becomes more important with steel and aluminum systems. Frame depth, sill construction, drainage, panel weight, and installation method can vary substantially between manufacturers. An irregular masonry opening may also require structural reframing before anyone converts the measured hole into an orderable unit.
Use this translation sequence:
- Select the configuration. Establish the panel count, operating direction, fixed and moving leaves, stacking location, and whether the system is a standard slider, multi-slide, or another opening type.
- Obtain the manufacturer's dimension sheet. Confirm frame dimensions, sill geometry, required clearance, installation tolerances, and restrictions on panel size or glass weight.
- Measure the framed opening. Record width and height at multiple points, including conditions that could affect the frame seat. For an existing opening, use the smallest usable dimension during the review.
- Apply the system-specific installation allowance. Reserve space for leveling, shimming, sealing, and waterproofing exactly as the manufacturer specifies.
- Order from verified dimensions. The factory-built frame and panels should reflect approved opening data, not an assumed stock call size.
The controlling measurement is usually the smallest one because existing frames are rarely perfectly square. A larger reading may capture a local gap that disappears nearby. Ordering from it can leave too little room to shim, seal, or align the unit without reframing.
Use precise increments, not optimistic rounding
Custom units may be ordered in 1/8-inch increments, allowing the specification to respond to actual site conditions rather than rounding an irregular opening to a whole inch (Derchi Door's patio door sizing guidance). That precision helps only when the field method is equally disciplined. A tape reading to an eighth does not make a moving wall, racked frame, or damaged sill reliable.
Separate these three values in the schedule:
| Dimension | What it describes |
|---|---|
| Design dimension | The architectural intent, such as a target opening aligned with the room |
| Rough-opening dimension | The framed hole available for installation |
| Ordered unit dimension | The exact factory-built frame and panel size |
The general contractor should not infer the ordered unit from the design dimension. The manufacturer, architect, installer, and framer must confirm how the selected system converts the rough opening into the factory size. For further context on made-to-order assemblies, review this guide to custom-made windows and doors. That confirmation is where an irregular opening becomes a buildable specification rather than an expensive field correction.
The Field Measurement Protocol for Custom Units
A reliable site measure records the opening as a three-dimensional condition, not as a single width and height. Existing walls move, floors change level, and old framing can conceal damage behind trim. Custom patio door sizes leave less room for guesswork because the factory will build to the information submitted.
Begin only after deciding what is being measured. If the trim remains, document whether the readings describe the finished opening, the rough opening, or the clear passage. Remove enough casing or interior finish to identify the framing condition, sill construction, and any obstructions that could affect the frame seat.
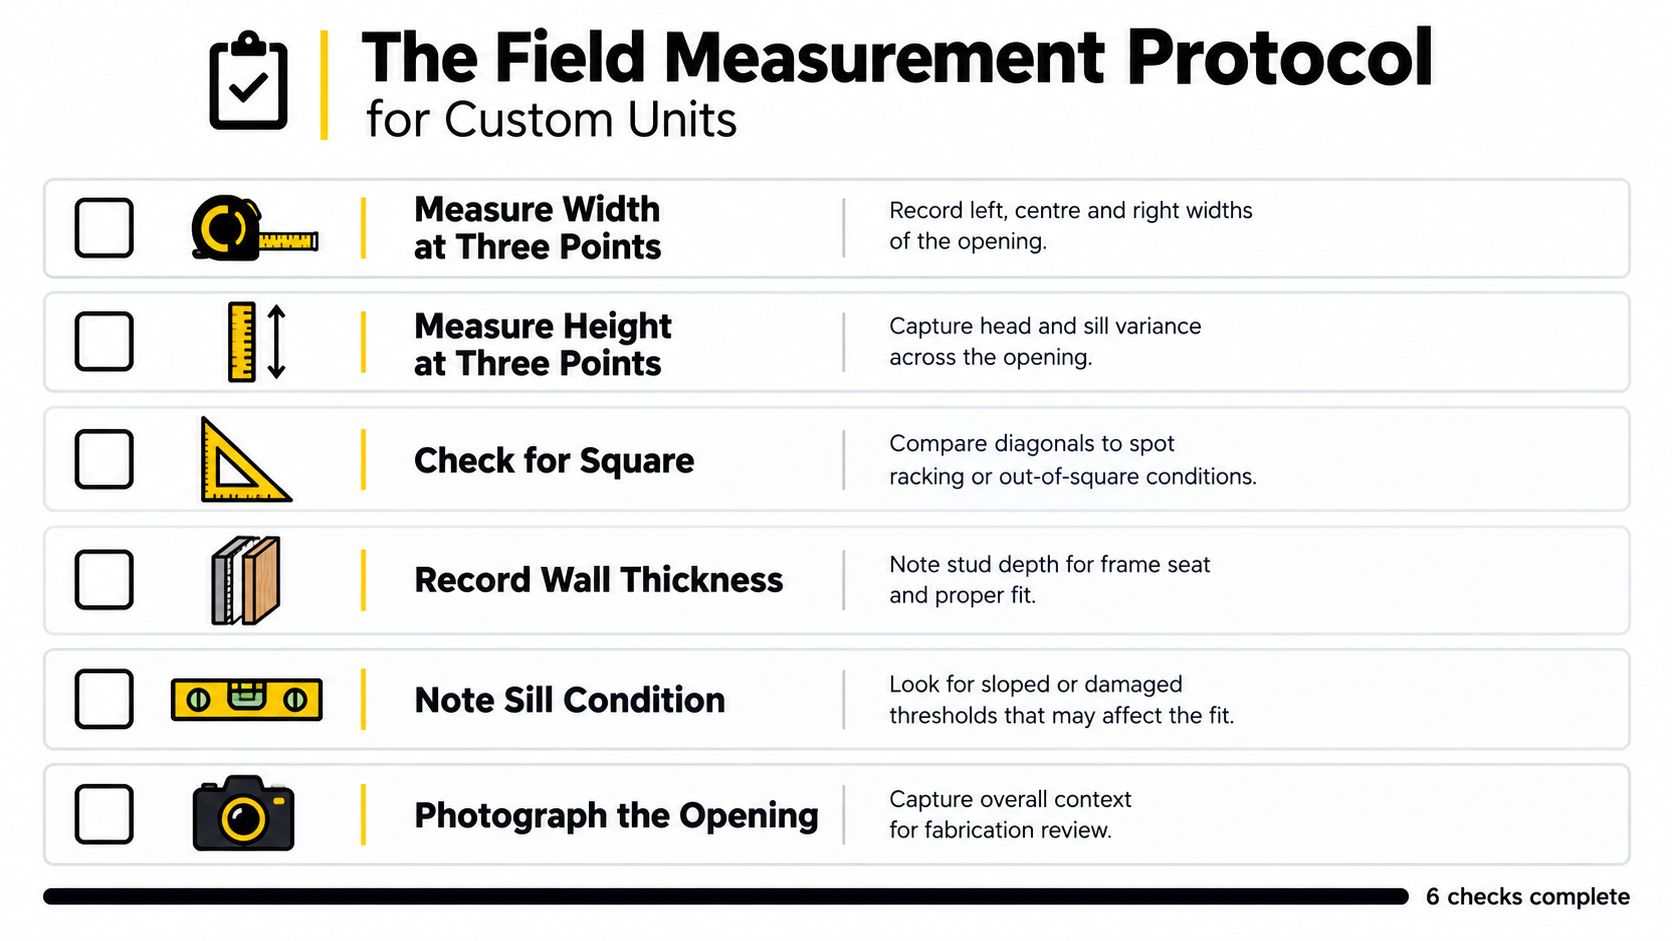
Record the opening systematically
Use a stable steel tape, a long level, a straightedge, and a laser when the opening is large or difficult to access. Record the measurement location and condition beside every value. A factory reviewer needs to know whether an apparent dimension reflects framing, plaster, masonry, a finished floor, or a temporary obstruction.
- Measure width at three points. Record the left, centre, and right readings. The smallest width governs the order unless the team decides to reframe or repair the opening.
- Measure height at three points. Take readings at both jambs and the centre. This reveals a sloping sill, a sagging header, or a floor condition that changes the usable height.
- Compare the diagonals. Measure from each upper corner to the opposite lower corner. Unequal diagonals indicate racking, and the difference must be resolved before the factory dimension is approved.
- Check both faces of the wall. Interior and exterior finishes may not align, particularly in remodels. Note offsets, returns, furring, and any projection that affects trim or frame installation.
- Record wall thickness and frame support. Document stud depth, masonry thickness, sill support, and where fasteners can be placed. A frame that fits the opening may still lack a sound fastening surface.
- Photograph the complete condition. Include close views of corners and sill details, plus wider images showing adjacent walls, floor transitions, roof overhangs, drainage paths, and access routes.
Verify the conditions that numbers don't show
Header deflection deserves direct attention. A reading taken before the structure is fully loaded may not represent the final opening. The framing engineer and general contractor should confirm that the header, jambs, and sill support remain within the selected system's requirements after the door's weight and surrounding finishes are installed.
Finished-floor height is another common source of error. If the new floor will be installed later, the measure must show the build-up, transition, and intended threshold elevation. Otherwise, the door may arrive correctly sized for the rough opening but leave an unexpected step, interfere with drainage, or sit too low relative to exterior paving.
For a homeowner or builder who needs a general field reference before the manufacturer's review, an accurate patio door measuring guide can help establish the basic documentation. It shouldn't replace the selected system's installation drawings or the installer's verification.
A precise order starts with a complete record of the opening, not a confident guess about its nominal size.
Structural and Logistical Limits of Oversized Doors
A wall-to-wall glass opening can look resolved in the elevations and still fail during framing, delivery, or installation. The door is only one part of the assembly. The header, jambs, sill, waterproofing, shipping package, access route, and installation equipment must work together.
Structural movement sets the first limit. The engineer must confirm what supports the load above the opening and how much deflection the selected system can tolerate. A large opening may require a deeper or specially engineered header. Excessive movement can load the frame, disturb seals, affect panel alignment, and make a sliding leaf difficult to operate. Coordinate the structural design with the fenestration supplier before the framing is finalized, while the rough opening can still be adjusted.
Width creates a chain of secondary decisions
A four-panel system can reach a very wide span, while multi-slide configurations can extend to 30 feet or more, depending on the manufacturer's system and configuration (Multi-slide manufacturer span tables, 2025). At that scale, the project team is specifying more than overall width. It must plan the delivery route, staging area, handling equipment, and protection for the frame and insulated glass.
Access needs review before fabrication. Measure gates, driveways, corridors, stair turns, finished openings, and the point where the delivery vehicle can stop. A unit can fit the wall and still fail to reach it. Large insulated glass panels require controlled handling because edge damage, twisting, or unsupported lifting can create defects before installation begins.
| Risk | Project question |
|---|---|
| Structural movement | Has the header been engineered for the opening and selected system? |
| Delivery access | Can the crated assembly reach the installation location without forced turns or lifting? |
| Glass handling | Does the crew have the equipment and protection required for the panel weight? |
| Water management | Does the sill connect correctly to the pan, membrane, drainage, and exterior finish? |
| Operation | Will the floor, frame, and track remain level enough for reliable movement? |
Accessibility and code review belong in the concept phase
A dramatic span may produce a disappointing usable passage. Panel count, fixed leaves, handles, interlocks, and sill profile all affect clear width. The ADA Standards for Accessible Design set a 32-inch clear-width minimum for accessible routes, so the design team should verify the applicable requirement rather than assume a wide overall unit provides an adequate route (Clarity Windows' patio door replacement guide).
Impact exposure adds another review. Projects in hurricane zones may require tested assemblies, approved configurations, and installation details that restrict available sizes or panel arrangements. Background on impact-resistant windows can help frame the issue, but the authority having jurisdiction and the selected manufacturer's certification determine what is acceptable on a specific project.
The workable design is often less spectacular on paper. A divided opening with engineered support, manageable panels, compliant clearances, and a realistic delivery plan will outperform a wall-to-wall concept that cannot be sealed, shipped, or operated.
How Material Choice Dictates Final Sizing
Material changes the geometry of the door, not just its appearance. Steel, aluminum, and timber each impose different limits on frame depth, thermal performance, glass support, hardware, and panel weight. The final opening dimension must follow the selected system rather than being designed around an abstract desire for the thinnest possible line.
Thermally broken steel prioritizes slender structure
Thermally broken steel systems can support a refined architectural expression with narrow sightlines while separating interior and exterior metal paths to reduce heat transfer. That doesn't mean every steel door can be made arbitrarily tall or wide. The supplier still has to verify profile capacity, hardware loading, glass weight, panel movement, and the required performance for the opening.
Steel is often selected when the design calls for a visually restrained frame and strong material presence. It can work particularly well where the meeting stile, jambs, and adjacent fixed panels need to read as a coordinated grid. The specifier should ask for the actual frame dimensions, glazing pocket, sash or panel limits, and sill build-up before setting the rough opening.
For related technical context, these notes on residential steel windows illustrate why profile selection affects both sightlines and installation geometry. The same principle applies to patio doors. The visible line is only one part of the assembly.
Impact-rated aluminum prioritizes tested performance
Impact-rated aluminum can be the appropriate choice for hurricane-zone work, particularly where the project must satisfy regional approval requirements. The frame, mullions, hardware, glass package, and anchorage are evaluated as an assembly. Reinforcement and deeper profiles may affect the sightline and the amount of glass within a given rough opening.
That trade-off isn't a defect. In a coastal project, certified performance and proper installation matter more than forcing a slim profile that doesn't belong to the tested configuration. The right comparison is between complete systems, not between isolated frame cross-sections.
Compare the entire assembly
| Specification concern | Thermally broken steel | Impact-rated aluminum |
|---|---|---|
| Primary design advantage | Slim, architectural sightlines and strong frame expression | Tested configurations for demanding coastal exposure |
| Sizing variable | Profile capacity, glazing, hardware, and panel weight | Reinforced profiles, approved glass, mullions, and anchorage |
| Main coordination risk | Underestimating thermal, sill, or panel requirements | Assuming a non-certified configuration can be substituted |
| Best decision method | Review section drawings and performance data | Confirm regional approvals and installation requirements |
Glass selection also changes the load and the frame. Double or triple glazing, laminated construction, tempered safety glass, coatings, and specialty textures all affect thickness, weight, and the pocket required by the system. A useful reference on professional window installation tips can support the general installation discussion, but the factory's approved glass schedule remains controlling.
Finalizing the Factory Specification and Order
A custom order should read like a controlled technical package, not an email that says “make it fit the opening.” The manufacturer needs the approved dimensions, configuration, performance requirements, finish, glass, hardware, and installation assumptions in a form that every project participant can review.
Start with the field record. Include the smallest width and height readings, diagonal comparison, wall thickness, sill condition, finished-floor datum, photographs, and any decision to repair or reframe. If the opening will change before installation, state who will verify the final dimensions and when that verification occurs.
Put the decisions on the shop drawings
The factory package should identify:
- Overall unit dimensions: Separate the ordered frame size from the rough-opening dimension.
- Panel arrangement: Mark fixed and operating panels, meeting points, stacking direction, and handing.
- Operation: Confirm sliding direction, inswing or outswing where relevant, handle position, locks, and access requirements.
- Sill and drainage: Show sill depth, pan or membrane connections, weep paths, exterior slope, and finished-floor relationship.
- Glass package: Specify tempered, laminated, double-glazed, or triple-glazed construction as required by climate, safety, and project performance.
- Finish and hardware: Record color, texture, corrosion resistance, hardware finish, and any special fabrication notes.
- Installation responsibility: Clarify who supplies structural support, flashing, shims, fasteners, sealants, equipment, and final adjustment.
The shop drawing review is the last practical opportunity to catch a dimension that looked acceptable in a schedule but fails in section. Check the frame against adjacent walls, interior trim, exterior cladding, floor finishes, and the planned waterproofing sequence. Confirm that the clear opening, not just the overall unit, serves the intended circulation and accessibility requirements.
Approve fabrication only after the architect, contractor, installer, and manufacturer agree on the same reference dimensions. Custom patio door sizes reward disciplined coordination. They punish assumptions that were never written down.
Black Badge Doors provides made-to-order steel and aluminum windows and doors, including custom sliding, bifold, and multi-panel configurations for residential and commercial projects. For a project where an irregular opening, slim sightline, or impact-rated requirement needs a coordinated factory specification, visit Black Badge Doors to discuss the dimensions and performance criteria with the supplier.
Read more

Residential Steel Windows: A Complete Buyer’s Guide
You're standing in a renovated living room, looking at a wall of black-framed glass. Morning light reaches deep into the space. The mullions barely interrupt the view, the garden feels closer, and the room appears...
Read more
Impact Resistant Sliding Glass Door Guide
You're choosing a door that has to do two jobs at once. It must make a waterfront room feel open, bright, and connected to the outdoors, then become part of the building's defensive envelope when...
Read more